Wednesday, January 30, 2013

Fixing the Roomba

I'm willing to try almost ANYTHING once. I never let my fear of ability prevent me from doing anything, that is why I thought I could fix my 5 year old Roomba 560. I had already replaced the front wheel, the dirt bin, the battery and the brushes, so when Alice (the Roomba) was spinning around in circles and going nowhere I thought I could help her out. 


I simply did this diagnostic test in the video, and it was very easy. The fix looked very easy too!!! It took like 3 seconds in the video!!! So for 15 dollars, I went on Amazon and purchased the Roomba error code 9 fix kit. I was more than excited to get going on this project when it arrived in the mail. The paper instructions told me to go to  http://www.roombaparts4less.com/ for the fix instructions. I don't like to read over all the instructions first, that can be intimidating. I take it step by step and start with the first step... then two hours later I looked up and saw this on my kitchen counter. 

And she couldn't put Humpty back together again.
Alice's guts all over the place. An overwhelmed feeling washed over my entire body. I didn't even get to the bumper sensor yet. How in the world was I going to get this all back together? My son was watching me the entire time and must have picked up on my dismay because he started chanting 'Go Mommy, go Mommy, go Mommy.' Well, who can give up with a little cheer leader like that encouraging you? So I pressed on, hoping that if I just stayed with the instructions that I would make it.
Finally getting to the bumper!!!

Here is the chip that needs to be fixed


I needed to look up Soldering instructions because I've only ever seen my mom do it on stained glass when I was a kid. The only thing I can tell you about it is that its HOT and kids get burned. After explaining this to my son several times, I convinced him not to touch anything near the area I was working.

Guess what? I did it!! I replaced what I needed to replace!!!Now I had to but Alice back together. No instructions. Yikes!!!


I have to say, thank the great skies for You Tube and some guy who decided to video tape himself repairing a Roomba. I bet he made this video for the arm chair engineer like myself.  My son loved watching this video with me. He made me watch it several times.
Even though I had 4 screws left over after 4 hours of Roomba Surgery, I had a feeling of accomplishment as I plugged in Alice to charge. Long story short...
Poor Alice, 4 missing screws and the same Error 9 code beep. Looks like the scrap heap for you. Goodbye dear friend.

Grade: F

Skill Level: Advanced

Difficulty Level: Impossible

Frustration Level: High


Friday, January 25, 2013

Creating Ice Marbles

It has been below 15 degrees here in the North East for a few days so it was a good time to try the ice marble  project that has been floating around on Pinterest.


Materials: food coloring, balloons, water, below freezing temperature. 
I am a master water balloon maker from my days as a child, so I feel as though I was sufficiently skilled enough to do this project. I stopped by the dollar store and picked up 2 packets of 24 inch balloons. Lucky for me I keep food coloring in stock at my home. 

After spraying colored water all over my laundry room, I realized that you must put the food coloring in FIRST before you hook the balloon up to the faucet. I do NOT recommend using the gel food coloring because there is no way to stop yourself from making a mess all over your hands.The blue all over my hands was especially nice because the next day I had a big meeting with clients; they have seen me with spit-up on my coat and Cheerios in my hair so I can't imagine Smurf hands would be any less professional. 


The liquid food coloring works the best because you have to use extreme precision to drop the food coloring at the bottom of the balloon without getting any color near the opening of the balloon.  Even if you are careful, I can't guarantee you won't be cleaning up colored water from all over the room.


After you fill up the balloon, pinch the opening and gingerly peal off  the mouth of the balloon from the faucet, make sure that you squeeze out any air left in the balloon to make them as round as possible. You can see that I still left some air in these balloons because I was getting tired of wiping down the room after each accidental balloon spritzing.  When you've had enough, its time to bring the balloons out into the freezing cold air.  I thought the worst part of the is project was the smurf hands, but I was wrong. The worst part of this project was being in 10  degree F weather with wet pants and shoes after you pop a balloon. Here is a tip, laying these balloons on frozen grass is the equivalent to dropping them on a bed of nails. I tried to lay them on the driveway, but they started to roll away, into the grass and popped anyway. At least it was not on me. I finally found a spot they did not roll. It took two days with a maximum temperature of 15 degrees for the water freeze enough to take the balloon off. You can easily remove the balloon by rubbing your rubber soled foot on the balloon and it comes right off the ice. Even after 2 days they were not completely frozen, but frozen enough to take the balloon off. It seems that they are more frozen on one side than the other. It would have been a better idea to flip them over after one day of being outside. Some of the water leaked out from the center on some of the ice marbles and made a hollow ball.

My sister did the project with smaller balloons that were a 1/3 of the size of what I show here, she had less problems than I did and her ice froze in 1 day. So if you are going to try this at home, make them a little bigger than your fist and save yourself some aggravation.

Grade: C (I HATE BEING WET AND COLD)

Skill Level:Easy

Difficulty Level:Moderate

Frustration Level: Moderate


Tuesday, January 15, 2013

Making a Pet Cage Cozy

Are you tired of looking at your pet's mess all over your floor? I sure as heck am. Candy (Lion head bunny) and Tina (Senegal parrot) sure do make a mess that I do not appreciate cleaning up every day. 

Jo-Ann fabrics and crafts was having a sale on fleece material recently for 4 dollars a yard. I ran through all the things that I could use if for, in my head, and I came up with this pet cozy idea!!! I bought 4 yards for this project because my bunny is in a cage with a perimeter of 10 feet and I wanted to make sure that I gave myself a little wiggle room. What's good about this material is that it doesn't fray when when you cut it, this means that stitching up a hem is unnecessary. I hate to sew!!! 

I got out my fabric, fabric sheers, dollar ribbon, and a hole punch.

You can forget about the whole punch. It does not work on fleece. That was a big FAIL.

Sharp scissors is a must for this project. I know you have those ratty ones in your junk drawer that you use for cutting chicken, wrapping paper and opening packaging of kid's toys. Don't even think about using that!! Put that sorry excuse for a tool back in the drawer and buy yourself decent pair of $25 fabric scissors and only ever use them on fabric.  At the end of the day, you will thank me.


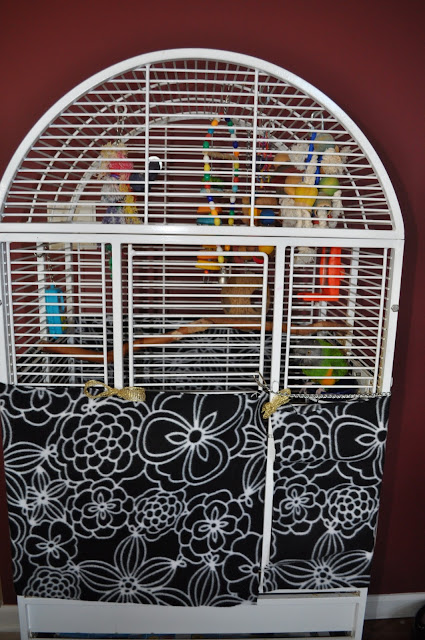
First I cut the fabric to measure twice the height I wanted it and folded it in half.  I cut small holes through both layers of fleece at the top and bottom of the fabric. Then used ribbon to tie it to the cage starting at the door opening.  When I got to the part near the litter pan, i unfolded the fabric, cutting a slit in it to make it higher in that area, this way it will catch what ever Candy kicks out of the  litter pan.


When I got to the end of the cage I cut the fleece to the exact size of the cage. Notice how messy the cage is, I just cleaned it shortly before I started this project.  Its a mess inside, but clean on the outside of the cage


 And I made one for Tina too... Can you find her in the cage?


I've had these for a month now and they are really working well to reduce the mess. This is especially true for Tina (the bird), she drops seeds everywhere but now that mess is contained to the cage. Candy and Tina chew everything, EXCEPT the fleece.  They did both chew the ribbon that I used to tie the fleece to the cage so I swapped out the ribbon and used paper clips instead. You could also use florist wire as well, (I can't find mine since the kids took it).  What's nice is that you can wash it in the machine, but I recommend that you take out the paper clips and ribbon first. It washes  nicely!!! 

I still have some fabric left over from this project... I wonder what I can do with it next...


Grade: B (should have used the paper clip from the beginning)

Skill Level:Easy

Difficulty Level:Easy

Frustration Level: Easy


Tuesday, January 8, 2013

Homemade Laundry Soap

Homemade Laundry Soap!

So I found a few bloggers who emphatically encourage you to save money by making your own laundry soap.  You can save lots of money (It's less than $20.00 for supplies for a year reports one site!) and you only have to make one batch for the whole year!  That's a lot of savings since my usual liquid detergent costs me $15.49+ for a 109 load bottle, which lasts my family of 3 about 2 1/2 months.  So a one time trip to the store to get the goods and one time spending about a half an hour to put it together for an entire year!  Sounds great, sign me up!   It works for my HE frontloader!  Awesome!  And it's good for sensitive skin!  An added bonus!

I decided to try the recipe for a powder. Usually I purchase liquid at the store, but the liquid recipes require me to cook the soap ingredients on my stove,  add water when cool, and buy a glass beverage dispenser to store it in.  It seemed way more involved than I wanted to get for making laundry soap!  So I hit my easy button and made the powder!

Here's the recipe I used:
1- 4 lb. box 20 Mule Team Borax
1 1/2 bars of Zote Laundry Bar Soap or 3 bars Fels-Naptha Laundry Bar Soap, finely grated

Mix together and store in an air tight container. Use 1 - 2 tablespoons per load. 

Sounds easy enough!  I noticed some comments on the difficulty in finding the Zote or Fels-Naptha and they recommended looking at a hardware store.  So off I went to my local Home Depot.  I was very disappointed that they had nothing on my list!  So back in my car to the next location, Lowe's.  Yes!  They had the Zote!  And it was only $1.09 per bar!  They had either white bars or pink.  So, of course I chose the pink!  Let's make our homemade soap pretty!


My next stop would be my local Walmart.  I went to the laundry aisle and voile! There were all of the ingredients for my project sitting next to each other on the shelf, including the Fels-Naptha!  LOL!  I should have just started at Walmart!  Lesson learned for next time! Only the Fels-Naptha is yellow and I think the Zote smells nicer! So the Baking Soda was $2.12, the Super Washing Soda was $3.24, the Borax was $3.38, and the Fels-Naptha was $0.97 per bar.    

Since the Fels-Naptha is yellow and I had my heart set on making pink laundry detergent, I went for the Zote!  So my grand total was $10.38 for all of this year supply of laundry soap!  Woohoo!  Since I was really lower than what the blog said, I purchased this tote to store it in. 
It's a 20 quart Sterilite container that cost me $3.97 at Walmart.  Since actually making my soap, this is a little big.  My detergent only took up half of this space, but it did make it easy to stir without a mess.  So, now to actually get down to the soap making since I have all of my supplies.

Step one, grate the soap.  The blogs I looked at had some complaints that there was soap residue left on the clothes, So I decided that instead of shavings of soap, I had better grate it a little finer so it would all melt.  I started with my box grater (good old Bessie the cow bell!) but after one pass, I knew this would be too much time and effort.  So out came the Cuisinart multiprep 3 cup mini processor!  I chopped the Zote up into pieces about 2 inches square and I threw 4 in! My minichopper hated this!  When it started to get hot and smell, I recalled that someone else had made the comment that they needed to add something to chop the soap.  So I chopped the soap up into about one inch chunks and put in about a tablespoon of the baking soda to the soap, which helped tremendously and made my minichopper happy! (I personally chose the baking soda since I knew if I breathed in the powder, I wouldn't have some kind of coughing fit or allergic reaction to ingesting it!).   When I was finished, it looked like this:
So pretty!  This is making me excited to get some laundry going and try it out!  LOL!  Once I had all of my batches of soap finely grated (like parmesan cheese!), I layered all of my supplies in my tote and  stirred it with a paint stick I found in my garage!  Here is what it looks like all mixed!

Now several bloggers had made their storage look really pretty.  That's great for them!  As for me, I'm the only one in my laundry room so what's the point of buying fancy stuff!  I also saw that people were printing out fancy labels for their jars.  Well, here is what I did!  
All I needed was a blue sharpie marker that I already had in the house!  I mean, if the point of making the soap is to save money, why waste my savings on a fancy glass jar that I would drop off the shelf and shatter and all of the expensive fancy printed labels and the the ink to print it with! 

I washed my sheets first using 2 tablespoons of my new soap!!  They turned out great and smell nice too! There was no soap residue.  I would definitely recommend you try this out!  Although some bloggers recommend making your own fabric softener too by using vinegar, I just couldn't do it! I love my Downy too much! Baby steps! LOL!

Total time involved from start to finish, including clean up:  40 minutes (less if I would have used a larger food processor).

Grade: A

Skill Level:Easy

Difficulty Level:Easy

Frustration Level: Mild (Grating the soap takes time as well as clean up.  Never do this project with small children around as they will want to "help" stir and you will have all mess and no soap!)


Update Note:  I went to make more laundry detergent and found that my Zote soap was dried.  When I went to cut it, it was crumbly.  This actually worked out better than when I initially made the soap!  I was able to put half of a bar in my mini processor and it pulverized it to a complete pink powder!  Took only 5 minutes to turn 1 1/2 bars of soap into an easily mixable powder!!  You may want to open your bars and let them dry a little.  It did nothing to deter cleaning and worked the same in my HE machine as when I made this originally!

Saturday, January 5, 2013

Trains!

My son is sure lucky that his mom is a train enthusiast because he is wild about trains. I was fascinated with my Dad's American flyer and his HO track that he still had from when he was a little boy. By  the time I was 10 years old, I was setting it up all by myself at Christmas time. I remember specifically that my little brothers had no interest in the trains unless I was touching them. All older siblings know that old trick!!

If your child is into trains the first thing you have to learn about is train track. And if your child is into trains, you already know who Thomas is.  There are 3 types of toy track where a Thomas train can run:

                               Wooden Track
Brio, Lionel, Thomas all make wooden track. All of the wooden track that I have seen all fits together)


Track Master


Take and Play


None of the track shown above will fit together so be careful of what you buy and look at the name of the product carefully. You CAN use the Track Master train with the wooden set, but not the other way around. The Take and play is really little so it will only use the Take and Play trains. We have all 3 types plus some track brands for different trains, I think we have it all. I'm considering a gift registry for my son's next birthday so I don't get another different type of track.  To a kid, it doesn't matter which kind you get, and you will end up with all these different types of track in your home. If you are getting a gift for someone else's child, ask the parent which kind of train they want in their home.

For the more advanced train lover there is different sized trains popular here in the US that you can get at hobby shops and train stores. They are listed in order of size from smallest to largest: 

  • Gauge
  • HO Gauge
  • Gauge
  • G Gauge

Gauge identifies the distance between the rail heads which tells you how large your trains are going to be. I have HO Bachman (this manufacturer carries Thomas) and O gauge Lionel trains in my house. My son is in love with the little N Gauge trains but I'm not attempting that until his manual dexterity improves. That size train can be frustrating for a 4-year old. The G Gauge is EXPENSIVE because it is so big. It is used in gardens. I read a blog that used the O Gauge in the garden and I'm excited to try it this summer.
There are other gauge trains but you are going to have a hard time finding track and accessories. I'm sure it will get overwhelming if I go over it all, so I'm just going to keep it to what is the most popular for in the blog.

If this is the first time you ever set up trains, you should just get a starter pack and then buy expansion packs to add on to your original set up. But if you are like me, you want a custom design so you have to order the track individually to get the look that you want. I'm not going to sugar coat it, custom setup is very difficult, but if you have a lot of time and refuse to give up, it is doable. 


O Gauge (Fast Track)


The most easy set up for a train is the circle or oval. When you buy your starter package you will get a transformer (you only need one of those per train set up), some track and some wires. I suggest that you buy the FAST TRACK (shown above) because it is much easier to deal with than the standard track, sometimes they both do fit together.

If you are going to start buying curved track and slapping stuff together yourself, you must learn that all curved track does not have the same radius. What does that mean? Some track is not as curved as others so that you can make different sized circles.  The bigger the radius, the larger the circle, the smaller the radius, the smaller the circle. I found this out the hard way with my HO set when I just started slapping curved track together and couldn't figure out why I got some funky shape instead of a half circle. 

The the larger gauge tracks will have to be a larger radius than the smaller tracks so the train can actually make it around the curve. Below are the list of different radius curved track I have found, I do not know if there are others because I'm not looking for any more different types of radius track, that is for sure!!  


HO Gauge
15"
18"
22"
22.5"
24"
26"
28" 
35.5"

Gauge
27"
31"
36"
54"
72"


Your best bet is to not mix the curved radius track on the same circle, unless you know what you are doing. To make matters even more confusing, the curved track can come in different lengths in addition to a different radius. When you are buying curved track make sure you check the radius and length of the track so that it is all the same if you don't want to drive your self insane.

It took me about 4 hours to do this setup on my own below, it would have been a better idea if I would have laid out a design first instead of just trying different track to see if it fits. 

HO Gauge (Fast Track)


(Notice the additional toy track under the table)