Sunday, December 28, 2014

Clothes Pin Nativity : Wise Men and Animals


I think my favorite part of my Clothespin Nativity was the 3 Wise Men.  Just made of clothespins and ribbon, then glued together with Aleene's glue and finished with sharpie marker, they turned out to be a stylish group of men.

The easiest thing about this was the fact that I used my old wired ribbon because it made it easier to affix the material in the way that looked like flowing robes. 


The donkey and the sheep body was created the same with 3 clothespins each glued together, the legs were cut off the clothes pin in the center to separate the front and back legs.

The donkey's head was just a clothespin hot glued on a just little tilted to give him an inquisitive look. The sheep's head was just a tiny piece of the bottom of the clothes pin glued in a midst a bunch of cotton balls. These animals are so fun, they just crack me up every time I look at them.

Tuesday, December 23, 2014

Clothes Pin Nativity

I make my friend's Christmas gifts every year, I usually make everyone a similar item, but my one very Catholic friend always requests a Nativity  every year. I think she is trying to slowly convert me to Catholicism one craft project at a time. This year I decided to step up my game and do a clothes pin nativity. 


JMJ Clothes pins

  • My materials included 
  • Clothes pins (the ones that look like people), 
  • Twine, 
  • Burlap (I had some with gold flecks that I saved from a wedding shower gift. I save everything,)
  • White and tan felt,
  • River birch sticks from outside,
  • Some garden sheers to cut up the sticks and fabric sheers for the fabric.
  • Aleene's Clear Gel Tacky Glue and hot glue
  • Sharpie Marker
I started out by rolling the burlap around the clothes pins and fixing it with tacky glue. If you like having burnt fingertips then by all means use the hot glue because it works faster, but I'd rather be patient and still have feeling in my fingers. 

I cut the felt into rectangular pieces and glued them around the heads and folded and glued it to the bodies, to give the appearance in the picture. Mary's felt rectangle was the length of the clothes pin and Joesph's was 1/3 the length of the clothes pin. I tied the twine around the top of Joesph's head to give the appearance of a keffiyehs. (Now there is your word of the day. Go Google it now.)
Jesus was just a cut piece of the bottom of a clothes pin with the burlap glued to his head, then another piece to swaddle him in. Swaddle him just like you did your own babies, only tinier. 

I started out making Jesus's  manger bed by cutting some thicker birch pieces the same length, hot gluing them into 2 X shapes then taking one piece to hot glue across the bottom V part of the X to hold it all together. The thinner birch pieces were cut and glued length wise as shown in the picture. I misplaced my tacky glue so I just got out the Elmer's and glued on the sticks.

Use the sharpie to pencil in the eyes. I just go with simple shapes. If you screw up the eyes, the entire thing looks creepy. 

Stay tuned for the blog update for the sheep, donkey, barn, and wise men.

Grade: A
Skill Level: Moderate
Difficulty Level: Moderate
Frustration Level: Moderate
Cost: $ (Cost of Felt, burlap and clothes pins)

Tuesday, December 16, 2014

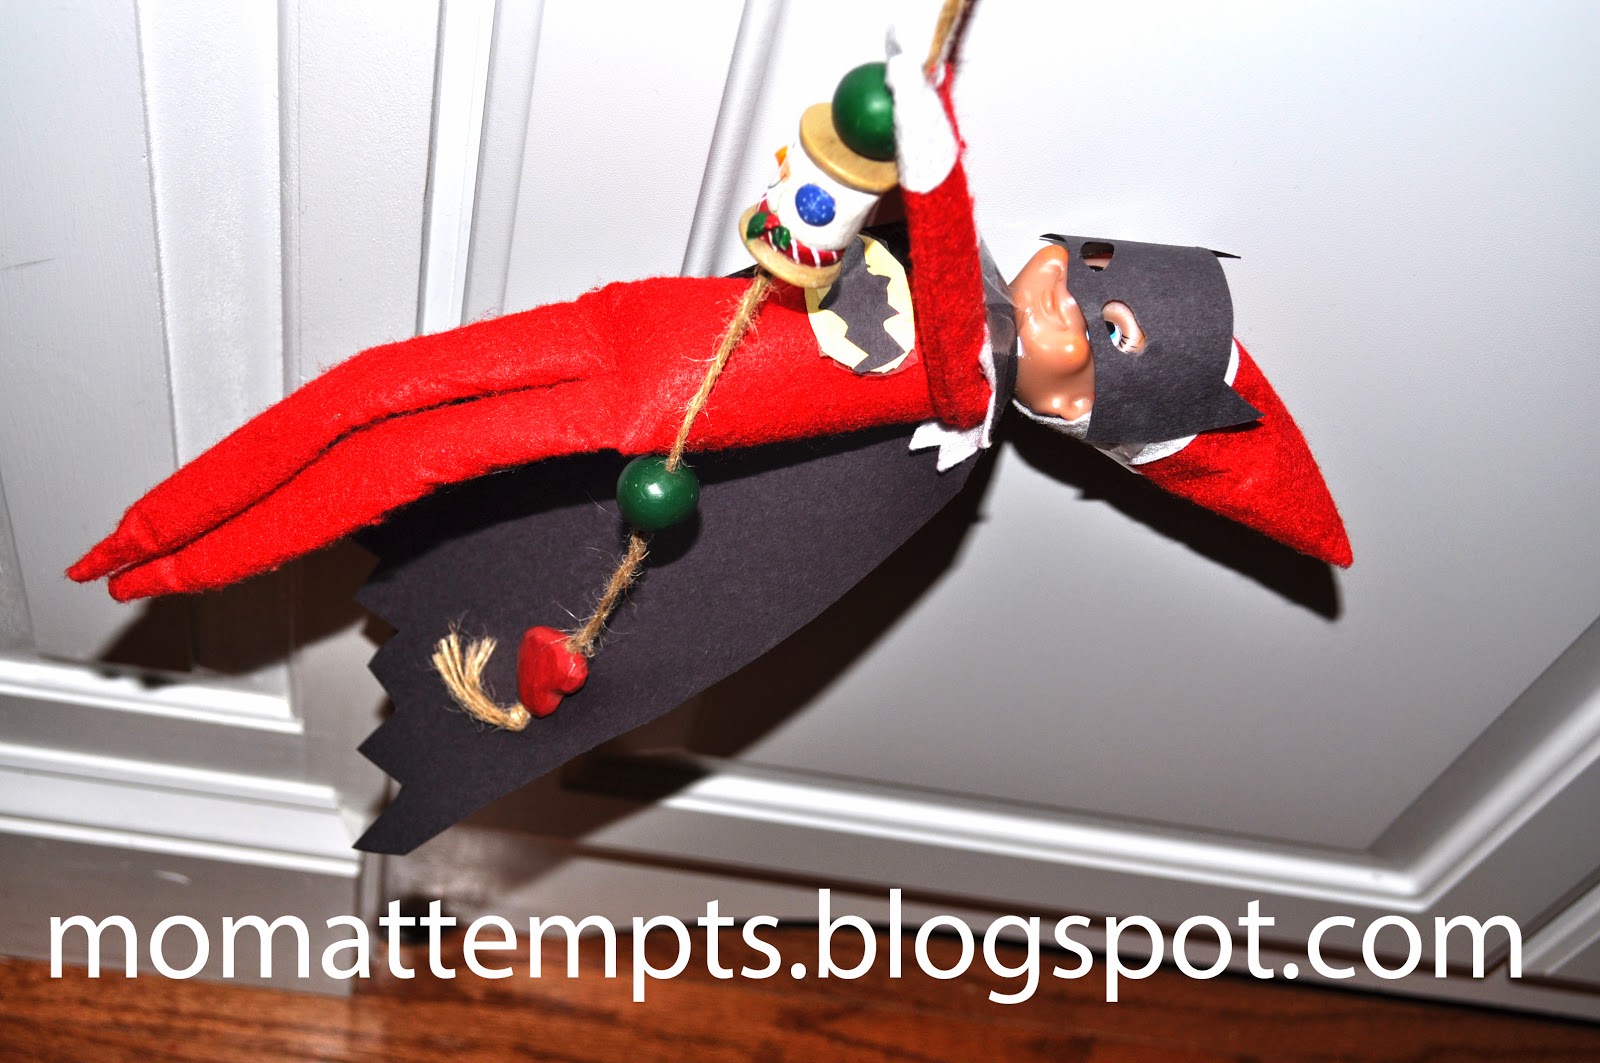
Batman Costume for Elf on Shelf - With Free Printable


On my local Facebook yardsale group, there was a woman selling felt batman costumes for elves at $8 each... and that convinced me people are crazy and will spend money on anything. I decided to give the same costume a try using black and yellow construction paper and tape. This basically free elf costume was totally worth the effort, especially since it amused my kids for an entire day. You can easily make them as well, just print the template below on construction paper, cut that out, tape it to the elf  and viola... Batman. I just saved you $8, you're welcome. 
Grade: A
Skill Level: low
Difficulty Level: low
Frustration Level:low

Cost: basically nothing


Free Printable


Sunday, December 14, 2014

Paper Fairies Mixed Media Art

It was love at first sight when I found Julie Nutting Prima Doll Stamps. I see them all over Pinterest and I found one doll stamp that reminded me of a fairy then away my imagination went.


Materials,
  Prima Doll Stamps
  Butterfly Stamps
  Clear Acrylic Block (for stamping)
  Acrylic Paints
  Black and Gold Ink Pads
  Black Sharpie Fine Point Pen
  Tiny Scissors
  Inkadinkado Mindscapes Clear Stamps (Butterfly)
    Colored scrapbook Paper
  Cardstock

You can buy these cling stamps on Amazon, you need an acrylic block to stick them on so you get an even looking ink stamp. I could not find an acrylic block large enough to hold the doll stamp, but I did find this Fiskers cutting thing at Jo-ann fabrics. I wish I could tell you what it was, but it was the first clear thing I could find that was large enough to stick the cling stamp on.

Its pretty simple to make these paper dolls, but the cutting is tedious. You ink the stamp and press it on several different papers, cut them all out and glue the smaller cut-outs on the larger cut outs. The largest cutout should be on heavy card stock so that the paper glued on top of it will not force it to curl up. There are craft scissors that are used specifically for this, but I used curved and straight cuticle scissors. I find them easier to use, but they give me blisters. 

I used acrylic paint for the skin and the hair. I loaded up my brush with 3 different pink (or green or blue) acrylic paint and swiped the curls to give the hair fun highlights.  Its always good to go over everything with a black sharpie marker, it just makes it pop.

For the wings, I just found this beautiful, intricate stamp by Inkadinkado. After I cut it out, I thought that maybe the wings looked too much like angel wings and not enough like fairy wings. I asked for an expert opinion (my mother) and she told me I should cut them more deeply to resemble insect wings. You can see the difference in the picture. I also cut the wings directly down the middle so that i can position each wing on the back of the fairy where they needed to go. 

One of my favorite parts of mixed media crafts is adding embellishments.  I use nail art stickers from the dollar store because they are small and cheap. 

I will finish blogging about the mushrooms and the canvas in another blog entry as soon as I can get to it!!

Happiness is playing with paper dolls!


Grade: A
Skill Level: Moderate
Difficulty Level: Moderate
Frustration Level:High (I find cutting anything is frustrating)

Cost: $$

Saturday, November 29, 2014

Karate Elf on the Shelf - No Sew Costume

I am stepping up my elf game this year with felt costumes, because obviously, I'm crazy. Also, there is nothing I like better than starting a project at 10 O'Clock at night (sarcasm). But I HAVE to because it is imperative that I am positive, that everyone is in bed, eyes closed and knocked out. I should probably do a 'Mom Attempts: putting her kids to bed'... but we all know I'd fail miserably.  

My son just tested for his orange belt and my daughter will soon be testing for her brown belt, so I'm sure they'd get a kick out of their elves practicing Kenpo Karate.  I am so surprised that it was only 4 easy steps.

Materials
   White felt 
   Any desired colored felt
   GOOD FABRIC scissors
   Bamboo skewers
   Old fruit or vegetables (its weird, but trust me)

Karate Elves
1) Cut a strip of colored felt with your GOOD FABRIC scissors. Not with your dull kitchen scissors that is used to cut paper, the dog's hair and chicken cutlets... I'm talking your quality pair of fabric scissors that is hidden from your husband and children so they don't ruin them. If you use any old scissors on felt, you will be cursing this project.

2) Again, with your GOOD FABRIC scissors, cut a rectangle piece of white felt then cut a hole in the center of it.

3) Slide the elf's head through the felt, push the bottom of the white felt through the elves arms and tie the colored strip of felt around the waist. Easy peasy karate gisy. 

4) For the hard part... I just couldn't let it go with the costumes, I HAD to position them to appear to be in a match, so i just slid bamboo skewers through the bottom on their gi and stuck the sharp end of the skewer in an old zucchini to stand them up ( it was about to go bad anyway). I put other fruit around them to hold them up into position and i just manipulated their arms and legs until it looked like one elf was kicking and the other elf was blocking. I did this by sliding Alfy's leg through his arms and moved Belle's arms until she looked like she was blocking. I know some people modify their elves to have bendy arms and legs, however, my elves are not modified.


Check out my blog on my Elf setup last year, but that humor was more for my adult facebook friends and my kids did not see it!!!
Good block Belle!!! Sorry Alfy no point for you!


Grade: A+
Skill Level: Low
Difficulty Level: Low
Frustration Level:Low

Cost: Less than $2

Saturday, November 22, 2014

Mixed Media Camera

It was my friends BLANKITY BLANK birthday this week (At our age we only provide the actual number for legal documents ONLY) and I wanted to make something personal for her. She is a photographer at True Story Photography and took My Christmas pictures last year. I made her a mixed media camera and incorporate her logo on it at the very last second.
I started out with the perfect scrapbook paper with little teal cameras on it, then I chose acrylic paints and other papers that matched. I threw in some red just to make it exciting.

I just threw all the acrylic paint colors on the canvas and just started blending. The biggest problem, I think, is the urge to over blend which makes your canvas muddy instead of having an overall marbling effect.

While still wet, I added some lighter paint to a swirly stamp (swirls are my favorite). After the canvas dried I added a light sponging of strategically placed red just to add dimension and bright color.


Most of scrapbook paper had designs. For the paper without a design, I used my butterfly stamp to create a whimsical effect. It was easy to cut out shapes to create a camera because the shape is pretty basic. 

I went around the edges of some the papers with acrylic paint to provide an outline effect. 

I printed out "... worth a thousand words" on my printer and added my swirl stamps. 

After decoupaging the entire thing , I decided that i should have added a tree and key. Luckily I had a tree stencil and I had bought keys at the craft store. After stenciling on the tree,I decoupaged the entire thing again. The final touch was gluing on the key.

 I hope she likes it !


Grade: A
Skill Level: Minimal
Difficulty Level: Low to Moderate 
Frustration Level: Low

Cost: I have no idea, I had all this stuff at home already


Sunday, October 12, 2014

Teenage Mutant Ninja Turtle costumes

I've really been neglecting this blog lately because I've been so busy with my new adventure (which I will blog about as soon as I get it together). Meanwhile, I thought I'd go back in time to 2002 Halloween where my kids picked the costume: Teenage Mutant Ninja Turtles.  

The thing that made the costumes complete were the turtle shells that were made from metal turkey pans from the dollar store, spray painted green. I put a slit in the pan at the top and bottom and tied through green elastic so that we could wear the pans like backpacks.


The weapons and masks I bought online from the Halloween super-store, except for the nunchuks, which are real, from my daughter's karate class. I also bought the adult t-shirts online but had to make the kid's t-shirts because I couldn't find anything for kids t-shirts. I bought green t-shirts and created the belly of the mutant turtle with yellow and black slick paint. The scraps of fabric around our elbows and belts were made from fabric at Joann Fabric.


Grade: B
Skill Level: Minimal
Difficulty Level: Low to Moderate 
Frustration Level: Low

Cost: $-$$

Friday, September 19, 2014

Simple Crochet Coaster and Placemat Set

I recently started to take up an interest in crocheting again after being taught the basic stitches (chain, single crochet, double crochet -U.S. terms) when I was a kid.  Using the wonderful teacher Ms. Youtube, I was able to really advance my knowledge and skill!  I saw this great placemat that I wanted to try to give as a gift for a housewarming party (Crochet Spring Placemat).  It's adorable and I love it!  However the instructions are not quite written for a beginner (there are some missing steps you have to guess at!) and there are details missing like yarn type and hook size!  When I attempted the placemat using the directions, with my worsted weight cotton yarn and my H sized hook, I was getting something the size of my table and the holes were way too big! There were also no matching coasters. So, I am writing my own pattern using this as inspiration!

You will need:
Worsted weight yarn (4 ply) (for coaster and placemat)
Light weight yarn (3 ply) (for embellishment)
Size H-8/5.00 mm hook (for coaster and placemat)
Size F-5/3.75 mm hook (for embellishment)
Tapestry Needle for finishing off
Needle and thread for attaching embellishment

Terms:
Chain
Slip Stitch-SS
Single Crochet-SC
Half Double Crochet-HDC ( loop on hook, yarn over, go through chain, pull up loop, pull yarn through all three loops on hook)
Magic Loop
Treble (or triple) Crochet-TR (loop on hook, yarn over twice, go through chain, pull up loop, pull yarn through two, pull yarn through two again)


Coaster:  Approximately 5x5 inches or 13x13 cm
Row 1:  Loosely Chain 15. (this allows your piece to remain flat)
Row 2:  HDC in 2nd loop of chain from hook. (14 HDC stitches total)
Rows 3-10: Turn work.  Chain 1. HDC in same stitch and continue in each stitch in row.
Finishing main piece: crochet a single crochet all the way around with 3 single crochet stitches in each corner. Slip stitch to join end. Cut and finish off. Weave in ends.


Placemat: Approximately 12x17 inches or 31x45 cm
Row 1: Loosely chain 55.
Row 2 HDC in  2nd loop of chain from hook. (54 HDC stitches total)
Rows 3-30: Turn work.  Chain 1. HDC in same stitch and continue in each stitch in row.
Finishing main piece: crochet a single crochet all the way around with 3 single crochet stitches in each corner. Slip stitch to join end. Cut and finish off. Weave in ends.

Edging:
This is a modified shell stitch edging.
Slip stitch your color into the third single crochet stitch from the corner.
*Skip SC.
HDC 5 times same stitch. (6 HDC for corners)
Slip stitch in second SC.
*Repeat from * and slip stitch to close.
Cut and weave in ends.

When looking at the embellishment for the coaster and placemat, I didn't want to do the  original design but I did like the idea of something in the lower corner to make it pop.  I immediately thought a butterfly would be perfect because the wings would complement the edging.  After searching for and trying several different butterflies that ended up too big for my project (why don't people tell you the size it will be in the pattern!?!) I found my self looking at the flowers too.  After all, a simple butterfly is basically a flower minus one petal!  I found that they weren't quite right either.  So I got inspiration from the following two free patterns :
Flowergirl Cottage Flower Pattern and Sweet Butterfly Pattern.  That when modified together made the cutest little butterflies perfect for my coasters and placemats (approximate size of butterfly is 1.5x1.5 inches or 3.5x3.5 centimeters)!

Butterfly Embellishment:

Create magic loop.
Pull up one loop.
8 SC around loop
Pull end thread to tighten center ( I leave a little loose and pull completely at end of project.)Slip stitch in beginning chain. Chain one.
HDC 5 times in same stitch. Chain 1. Slip stitch in same stitch.
Skip SC. Slip stitch in next SC.  Chain 2. TR in same stitch 5 times. Chain 2. Slip stitch in same stitch.
Skip next SC. Slip Stitch in next SC. Chain 2. 5 TR in same stitch. Chain 2. Slip stitch in same stitch.
Skip SC. Slip Stitch in next SC. Chain 1. 5 HDC in same stitch. Chain 1. Slip stitch in same stitch.
Slip stitch in starting stitch. Finish off and pull starting loop tight. Weave in ends.

Monday, September 1, 2014

Beach Dreaming Mixed Media Art


About this time of year I think about how much I miss summer already. To push away the September blues, I decided to do a series of three beach themed mixed media art canvas pictures. Its great when you have a storage box filled with all these supplies from other mixed media / paper craft projects because you don't have to go to the store and spend more money. At least this is how I justify it to my husband.

One thing for sure that I keep in my craft box is spray ink. Mixing blue firecracker and pearls mist provides a dreamy sky look. After it dries I stamp it up by painting acrylic paint on my stamps.

I use tan acrylic paint and actual sand to create the beach. I looked a little strange dumping my canvas in the sand at the beach, but not any stranger than the 80 year old man in the tight red Speedo, smoking a pipe while staring at me.  

Curly Stencil
The water is painted with acrylic paint and the idea of waves are created by using a curly stencil with white and blue acrylic paint.

Scrap Book Paper
It was so easy to cut out houses and sailboats since they are simply triangles and rectangles. The umbrella was a little bit trickier, but whats great about using paper is that you can easily toss your mistakes.

Oil Pastel and Paper
To add a little more texture to the houses, I went around the edges of my squares with a darker color oil pastel and blended it in.

I always glue together my paper creations together, outline with sharpie, then Modge Podge them before I glue them to the canvas, with the exception of the really tiny pieces that are too difficult to work with.


   Make sure the final product is sprayed with clear coat to keep the sand from falling off.

Grade: A  
Skill Level: Minimal
Difficulty Level: Low to Moderate 
Frustration Level: Low

Cost: $$

Monday, August 18, 2014

Letter Art Photography

I found a frame at home goods with 5 slots for 4x6 pictures and decided to use my own B+W photos. The kids and I searched around for things around the beach that looked like letters. My kids were very creative, and were very helpful; my son saw the umbrella as a 'T' and my daughter cold see the lamp post looked like an 'r'.


It is easy to change color photos to black and white because it is an option on the photo site after you upload them. We used CVS photo and the pictures cost around 2 dollars.

Grade: A  
Skill Level: Low
Difficulty Level: Low
Frustration Level: Low
Price: $-$$ 


Tuesday, July 1, 2014

Lucy the Elephant Art


I have teacher friend who finally saved up enough money to retire to a beach house in Margate NJ. To ensure that I could visit her frequently, I made her a house warming gift for her kitchen.  She told me that she wanted something with a beach/wine/elephant theme with the colors yellow, blue and silver. 

The canvas is basically watercolors, acrylics, stamps and sand. Yes sand. I painted the bottom with tan acrylic paint and then dipped it in the sandbox.

Below are the directions to the Wine bottle and glass.

Materials:
     Sculpy Clay
     Stamps
     Sliver Acrylic Paint
     Black Acrylic Paint
     Paper 
     Rhinestones
    
1) I cut out shapes for a wine bottle and a cup as a template. Basically I folded it in half and cut the paper so that it was exactly the same on both sides.

2) Its important to soften up Sculpy (Polymer) clay before you bake it. You can use your hands but its a lot of work, I prefer the clay machine, you roll the clay through there a few times and it becomes soft. Also, it makes a nice, even flat clay piece much more easily than you could do with a rolling pin. My wine bottle was really large so I had to to it in two pieces and blend it together.

3) The clay is bumpy, so to take away from that uneven look, I used some stamps and some embellishments to add interest and make the imperfections less noticeable. Oddly enough, I had some rhinestones that fell off my old bling flip-flops that I re-used for this craft. I save everything shiny, I never know when I can glue it to something.   

5)Before painting, bake the clay in the oven as per the directions.

6)To add an antiqued look, I pained on black acrylic paint and wiped it off with a paper towel.

7) I added a Lucy The Elephant label by taking a picture of Lucy and editing it in word shop then printing it out on yellow paper.I used the Gelatos to add some flair to the label. The Lucy printable is included below. 

Grade: A  
Skill Level: Advanced (working with clay takes a little bit of experience)
Difficulty Level: Moderate 
Frustration Level: Low

Cost: $$


I
Print Me

Thursday, June 19, 2014

Sun Catchers for Dad Part II

Last year for fathers day, my kids made Superhero sun catchers. They turned out to be a hit, this year we decided to go with Plaid Gallery Glass,a more expensive way to make a sun catcher/ window cling.


Gallery glass is a product that I used years ago before I had children. I used it to add privacy to my bathroom windows so that I didn't have to add blinds or curtains. Plaid makes all kinds of patterns for you to chose from.  

This time, I decided to make my own. The kids and I made 2 window clings for daddy and o-pop (my dad)! You can buy Plaid Gallery Glass at any craft store, they come in kits and you can purchase separately. 


1) Print out the image you want to use.


2)  Place a Plaid plastic blank OVER your printout before you start

3) Squeeze out the black liquid leading to outline the image (I did this part myself, I assumed that the kids did not have the strength or the precision to do the outline)

4) Let it dry overnight before putting in the color

5) Let the kids squeeze different Gallery Glass colors in-between the leading. If you want to get fancy, you can add two colors in one spot and swirl them around with a toothpick, giving a interesting look to your fake glass

6) Try to pop as many bubbles as you can with a toothpick or bamboo skewer

7) Let it dry for 2 days, just to be safe

8) Peel it off an stick on a window

Instead of doing a window cling, you can also create your art directly on plastic. Plaid sells flat plastic sheets or you can go through your trash can or recycle bin and get the plastic out yourself. Just make sure that your trash is thoroughly clean and dry before you try to decorate it.


Print Me
Grade: A  
Skill Level: Low
Difficulty Level: Moderate (needs parental assistance)
Frustration Level: Moderate (kids always make a mess)

Cost: $$

Friday, June 6, 2014

Creeper Cupcakes

 My son is absolutely in love with the Mindcraft Creeper, so it was no surprise that he wanted creeper cupcakes for his birthday party at Pre-K. 

1) I made square cupcakes, from a box mix, with an individual brownie pan that I found in the local grocery store. The pans run around 9 dollars. You can also just use a regular square pan and cut the cake into squares.

2) Its important to cut the top of the cupcake off to make the cupcake flat because the creeper does not have a round head. This gives you an opportunity to eat all the discarded pieces and pretend that you are still on your diet.

3) You can color store bought icing with jello mix to give it the green color. I used just enough jello to make the icing green.  Ice the cupcakes and add green sprinkles. The sprinkles give it a pixelated look, at least that is how my daughter convinced me to add the sprinkles. Before you move onto the next step, you have to wait about an hour for the icing to harden.

4) Print out the creeper printable below and place wax paper over it. You can use a razor blade to cut out the eyes and mouth. Make a few of these as they do get soggy and unusable after about 4 cupcakes.

5) Place the wax paper over the cupcake and smear chocolate icing on top of your wax paper stencil (use an unused, washed, small craft paint brush or finger), then instantly take it off and it will reveal your creeper face.   


See printable below.


Grade: B  
Skill Level: Low
Difficulty Level: Easy
Frustration Level: Easy


Note: Lime and chocolate are not a great paring in flavor, but the kids ate them anyway. You could use food  coloring instead if lime cupcake icing grosses you out. On second thought, you should still use the lime icing if you don't like it, you just ate all those cupcake discards so you've really had enough cupcakes until next birthday.


Print Me

Friday, May 16, 2014

Mini Barn Raising

Junior Carpenter
Tragedy struck our house when a rabid raccoon massacred our chickens. I'm going to spare you the details, but it was a scene straight out of the movie Saw. I kid you not. Raccoons are mean. 

I wasn't going to let that nasty beast stop me from having fresh eggs and I decided to invest in a new red barn style coop from the tractor supply store and some new chicks from the local garden center. The coop came in a lot of pieces but my 5 year old and I had our power drill and we were ready to build.


Rain Gutters
The first four pieces went up like magic. My little helper even was able to get time on the drill. Everything fit reasonably well, though the side door does have quite a gap in it, but I can fix that at a later date by drilling in an extra piece of wood. We were chugging along like Bob the Builder but then hit a complete stop when it was time to put on the rain gutters, boy was that complicated. The picture wasn't clear and I had no idea what the heck was up with these things. It took me quite a while to figure out how to put it together. After that was done, the roof went up quickly. 

The next part that had me stumped was putting together the nest box. However, I think the directions were clear and if I wasn't interrupted with some important news bulletin from my children that needed my immediate attention every three minutes, it probably wouldn't have taken as long to put together. 
 
The quality of the coop matches up with the price. It isn't as sturdy as those 1000 dollar coops that mimic sheds, but it isn't 1000 dollars either. It does not have a floor on the inside and there is no door between the run and the inside of the coop and those are things I plan to add in the future.

   
Big enough to fit 6 pullets and a human 5 year old
Grade: B  
Skill Level: Low
Difficulty Level: Moderate 
Frustration Level: Moderate 
Price: $$$ 

Yes, he did fit himself through that tiny door


Saturday, May 10, 2014

Mosaic Birdhouse with Broken Tiles

Every time I see a wooden birdhouse go on sale at a crafty store I MUST purchase it. I usually just paint them, recently I experimented with doing a marble birdhouse, which turned out fabulous.  For mothers day I decided to step up my game and try broken tiles mixed with floral marbles. 

I get my creative/art side from my mom so I know that she would appreciate the effort that I put in on this gift, no matter how it turned out. I know this is the perfect Mother's day gift for her.

Materials
Unfinished wooden birdhouse
Broken Tiles
Floral marbles
Ceramic NipperMastic
Sanded grout (tinting optional)
Spatula (just for crafting, not food)
Sponge
Water

1) I had saved a bag of cracked pieces from my butterfly meadow dish collection for future tiling projects. So I just smashed the bag against the sidewalk. In hindsight, I should have used the ceramic nippers instead, it was time consuming finding all of the broken pieces and placing them together. If I didn't have the heart to break dishes and teacups, there is an estate store in my town that actually sells the broken ceramics and glass for 2 dollars a bag.  I picked up some of those too in order to give my piece some additional colors.

2)I laid out the tile pieces in a pattern on a towel to get a feel for what it should look like on the birdhouse. I used the ceramic nippers on the edge of the tile to break off pieces for a better over all shape to fit. Just don't stick ill fitting tiles next to each other, make sure they generally fit, almost like a puzzle, but you don't have to be neurotic about it.

3) I smoothed the mastic all over the birdhouse with my craft spatula (not my food one, that is gross). then placed the tiles on the mastic. Let the mastic cure overnight so that the tiles are snug on the birdhouse. DO NOT use the grout to attach the tiles to the house, they WILL fall off.

4)Mixing together sanded grout with water is like making mud pies; it reminds me of my childhood. I also applied the grout with my craft spatula to the house. I have found many uses for this 'craft' spatula. I tried using my fingers to smooth on the grout... BIG mistake with the broken tiles because now I have a nice gash in my hand. Resist the urge to rub your hands over the tile, you are asking for trouble. I used colored grout that I had left over from my kitchen floor. I think the colored grout looks so much better than the white on tile projects. It somehow gives it a more professional look.

5) When sponging off the grout, make sure the sponge is damp because a sopping wet sponge makes such a mess. I kept on rinsing and wiping, rinsing and wiping until the tiles showed through the grout.


I think my mom will love it.

Grade: A  
Skill Level: Low
Difficulty Level: Moderate 
Frustration Level: Moderate (this makes a huge mess)
Price: $ - $$